
Kerf Bending Techniques for Smooth Curved Woodwork Projects
Curved woodwork always grabs attention, whether on a custom shelf, a rounded cabinet face, or a flowing architectural detail. Kerf bending turns flat boards and sheet goods into smooth, controlled curves by cutting a series of precise slots that let the wood flex without snapping. Instead of wrestling with steam bending or laminating thin strips, kerf bending offers a simple, repeatable way to shape tight radii and gentle arcs while still keeping the piece strong and stable.
Quick Navigation:
Fundamentals of Kerf Bending for Curved Woodwork | Practical Kerf Cutting Techniques and Layout Methods | Forming, Reinforcing, and Finishing Kerf-Bent Curves | Frequently Asked Questions
At the heart of kerf bending lies a careful balance of spacing, depth, and blade width. Each cut works like a tiny hinge, and the pattern of those hinges decides how tight the curve can be, how clean it looks, and how well it holds up under use. The right wood species, smart grain orientation, and thoughtful layout turn basic sheet goods or solid boards into graceful, reliable components that look intentional, not forced.
Kerf bending involves more than just cutting a row of slots and hoping for the best. Clean, consistent kerfs demand a steady setup, accurate measuring, and attention to tear-out and burning, especially when working long runs or complex curves. Once the cuts are made, careful forming, clamping, and reinforcing lock the shape into place, while sanding, filling, and finishing blend away evidence of the cuts, leaving only a smooth, flowing curve. When done well, kerf bending opens the door to creative shapes and custom details that feel both refined and rock solid.
Fundamentals of Kerf Bending for Curved Woodwork
Kerf bending involves making precise cuts into the wood to allow it to flex into curves without breaking. Beyond the basic idea, the fundamentals start with understanding how each cut changes stiffness, spring-back, and the final shape. Factors like saw setup, fence alignment, and feed rate begin to matter just as much as layout lines on the board. Different core materials, such as MDF, plywood, or hardwood, respond in their own way once the kerfs open under pressure. Grain direction, glue strategy, and how the piece is supported while bending all work together to control consistent, predictable curves in real projects.
Expert Insight: In 2024, experimental studies showed that kerf-cut wood exhibits enhanced bending behavior with up to 30% greater flexibility compared to untreated wood, due to the controlled release of internal stresses.
Source: ResearchGate
How kerf spacing, depth, and blade width control the bend radius
Kerf bending involves making precise cuts into the wood to allow it to flex into curves without breaking. Kerf spacing, depth, and blade width work together to set how tight that curve becomes. Tighter spacing means more cuts per inch, so the wood flexes more easily and reaches a smaller bend radius. Deeper cuts leave a thinner “back” of uncut wood, which also allows a tighter curve, while shallower cuts hold a larger radius. Blade width controls how much material is removed in each kerf: a wider blade creates larger gaps that close more as the wood bends, tightening the radius. For a gentle arc on a 3/4″ panel, wider spacing, shallower kerfs, and a standard thin-kerf blade keep the curve smooth and controlled.
Pro Tip: A 2025 innovation in kerf bending uses online calculators to precisely determine cut spacing, enabling woodworkers to create seamless curves without visible gaps, revolutionizing DIY projects.
Source: Hackaday
Choosing suitable woods and sheet goods for clean kerf bends
Choosing wood species and sheet goods with predictable grain and uniform cores keeps kerf bends clean and consistent. Straight-grained hardwoods like poplar, maple, and alder resist random cracking and handle tight radii better than knotty pine or brittle oak. For plywood, interior-grade panels with many thin plies bend more smoothly than cheap sheathing with voids and thick core layers. Baltic birch plywood gives reliable results because the plies are even and the glue lines are strong. MDF and high-quality particleboard bend well with kerfs because the material is homogenous and free of grain, though it needs careful handling near edges. Avoid warped, twisted, or badly stored sheets, since uneven tension across the panel fights the bend and introduces flat spots or kinks.
Pro Tip: Kerf bending has become a staple in modern furniture design, reflecting a cultural shift toward sustainable and innovative woodworking practices that blend traditional craftsmanship with contemporary aesthetics.
Source: Woodsmith Magazine
Planning grain direction and curve layout for strength and appearance
Grain direction strongly affects both strength and appearance in kerf-bent parts. Long grain running along the length of the curve keeps the outer face continuous, helping the piece carry loads without telegraphing every kerf. When the grain runs across the curve, fibers act like short bridges between cuts and crack more easily, especially in tight radii for shelves or cabinet valances. Curves laid out to follow the natural flow of the grain also look smoother, with fewer distracting grain “kinks” at transitions. On visible faces, kerfs stay on the hidden side of the bend so the show face presents uninterrupted grain. For plywood, planning the curve so the face veneer grain runs with the curve gives a cleaner, furniture-grade look.
Practical Kerf Cutting Techniques and Layout Methods
Kerf bending turns into reliable, repeatable work when layout and cutting methods stay organized. After understanding how kerf spacing, depth, and blade width affect a curve, the next step is putting those ideas onto real boards and panels. Practical layout starts with deciding exactly where the curve needs to begin and end, then planning a pattern of cuts that keeps the kerfs hidden or balanced on the finished piece. Simple tools like story sticks, templates, and flexible layout strips help map out the curve, while step‑by‑step cutting sequences, test pieces, and clamping plans turn those pencil lines into smooth, accurate results.
Interesting Fact: Kerf bending reduces material waste by up to 20% in curved woodwork production, supporting environmental goals in the woodworking industry by minimizing offcuts and promoting efficient resource use.
Source: ResearchGate
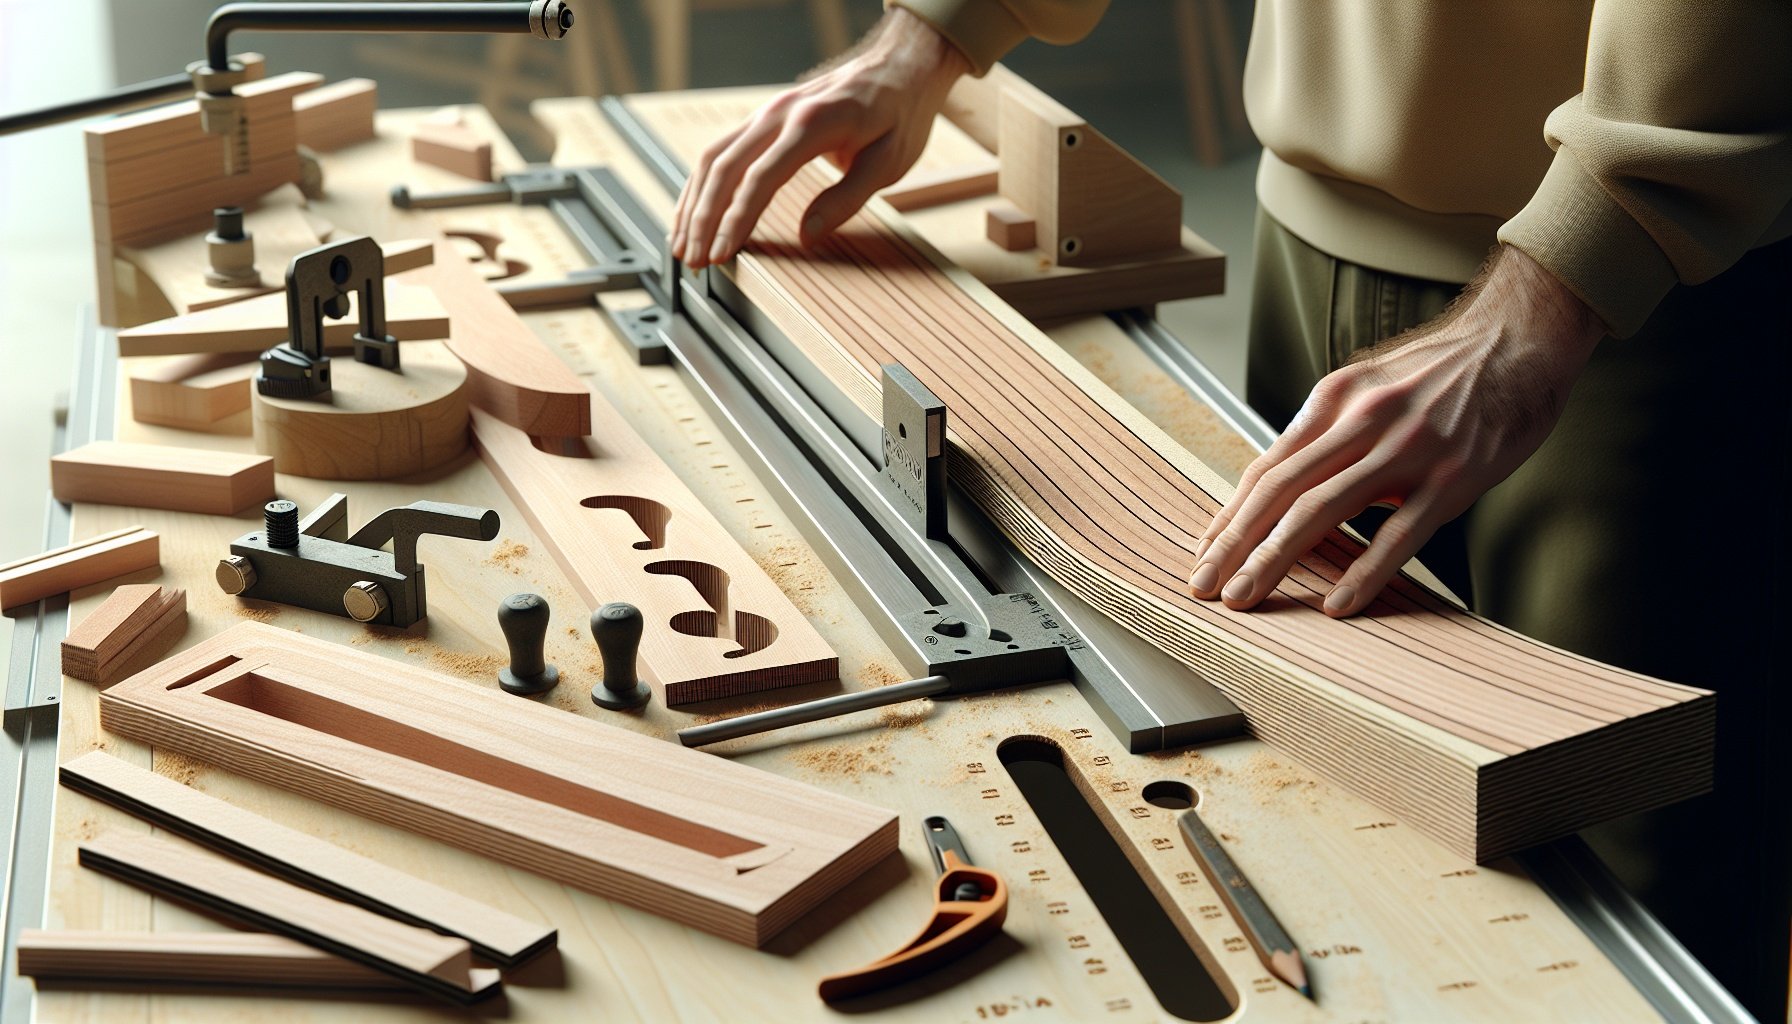
Setting up the table saw or circular saw for consistent kerf cuts
Setting up the table saw or circular saw for consistent kerf cuts starts with locking in depth and alignment so every groove matches the layout. A zero-clearance insert on a table saw supports the workpiece fibers and keeps the kerf clean, which helps the bend open evenly. Blade height is usually set so the teeth cut through 80–90% of the material thickness for strong, flexible hinges. A sharp combination or flat-top rip blade limits tear-out in plywood and hardwood strips. On a circular saw, a straightedge guide or track keeps spacing accurate and prevents wandering cuts. Consistent feed pressure, a firm fence setting, and test cuts in scrap from the same sheet dial in the exact kerf depth before touching the real workpiece.
Marking and measuring kerf patterns for tight and gentle curves
Marking and measuring kerf patterns for tight and gentle curves starts with transferring the curve to the workpiece, either by tracing a template or using a flexible strip as a bending guide. Tight bends need kerfs spaced closer together, often 1/4″–3/8″ on center, while gentle arcs can relax to 1/2″–3/4″ spacing. A marking gauge, combination square, or story stick keeps spacing consistent across the whole length. Lines run square to the edge and stay parallel to each other so every cut shares the same depth set at the saw. For long pieces, light pencil layout followed by a marking knife at each line helps keep the blade tracking exactly, reducing wander and producing a smooth, even curve after bending.
Controlling tear-out and burn marks when cutting multiple kerfs
Controlling tear-out and burn marks when cutting multiple kerfs starts with a sharp, clean blade that matches the material. A high-tooth-count crosscut or plywood blade reduces splintering on veneered panels, while a flat-top rip blade leaves smoother kerf walls in solid stock. A sacrificial backer board under the workpiece supports fibers at the exit side of the cut, keeping the show face clean. Light, steady feed pressure avoids heat buildup that causes burn marks, especially on hardwoods like maple and oak. Pausing mid-cut or forcing the board into the blade leaves scorch marks and uneven kerf widths. Cleaning pitch from the blade and using a zero-clearance insert also helps keep narrow, repeated kerfs crisp and ready to bend smoothly.
Forming, Reinforcing, and Finishing Kerf-Bent Curves
With the layout, cut spacing, and material choice already established, attention turns to what actually locks a kerf-bent curve into its final shape. Forming the bend against a solid template, keeping pressure even across the cut face, and controlling how far the kerfs open all set the stage for a clean, reliable profile. Reinforcing those opened cuts with glue, backers, or skins turns a flexible panel into a rigid, long-lasting curve. Surface prep, filler choices, and smart sanding then determine how invisible the kerfs become once finish is applied, guiding the next steps of forming, reinforcing, and finishing kerf-bent curves.
Worth Noting: The global woodworking machinery market, which includes tools for kerf bending, reached USD 5.20 billion in 2025 and is projected to grow at a 6.1% CAGR through 2032, driven by demand for curved designs.
Source: Coherent Market Insights
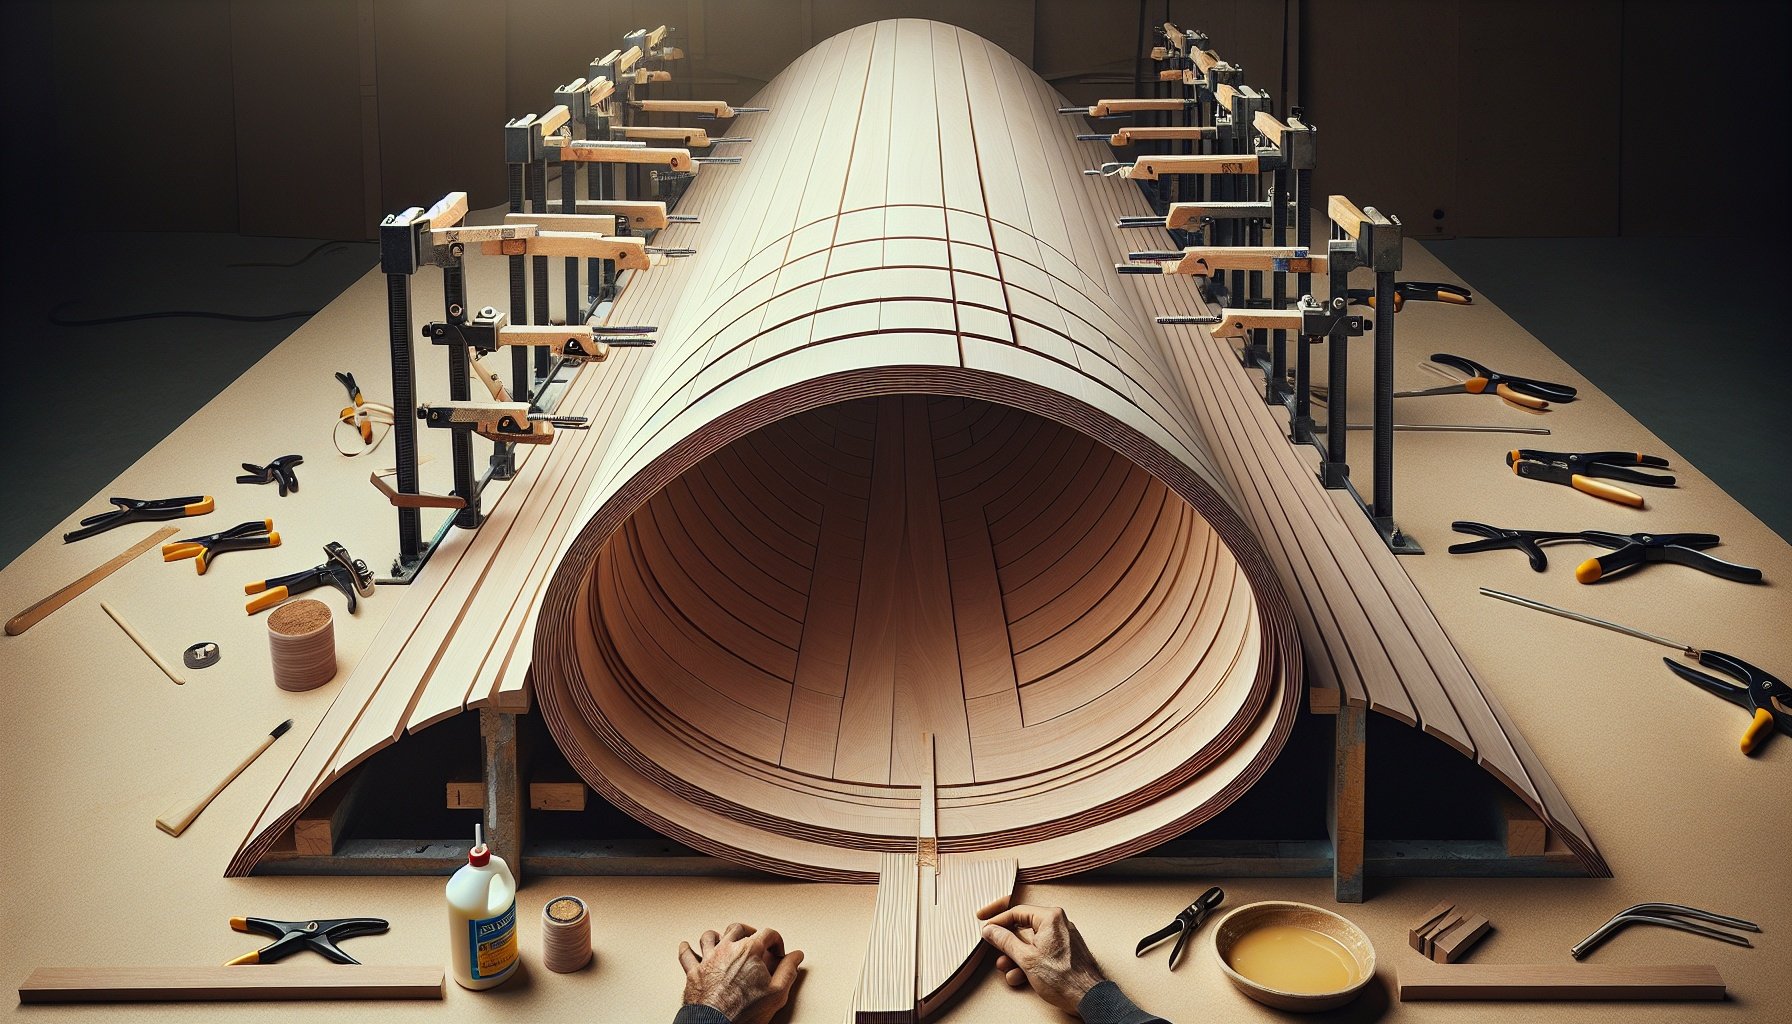
Bending over forms, clamping strategies, and glue-up options
Bending over forms works best when the workpiece is pressed against a solid, full-size template that matches the final radius. The kerfed face goes against the form so the uncut face stays smooth on the outside of the curve. Clamping starts at the tightest part of the bend, then moves outward in small steps using cauls to spread pressure and prevent denting. For long curves, a mix of F‑style clamps, strap clamps, and wedges keeps the curve even. Glue-up options include standard yellow PVA for most indoor projects, slow-set epoxy for complex assemblies, and plastic resin glue when creep resistance matters. Thin backer laminations glued over the kerfs can lock the curve while hiding the cuts completely.
Good to Know: Kerf bending techniques emerged in the mid-20th century as a method to create curved wooden elements without steam, allowing woodworkers to achieve precise bends using saw cuts that partially sever the wood fibers.
Source: Lost Art Press
Reinforcing kerfed sections with backers, fillers, or laminations
Reinforcing kerfed sections starts with choosing how the open cuts will be backed up once the curve is locked. Thin solid-wood backers or plywood strips glue over the kerfed face, bridging across the slots so the tension side of the curve acts like a single, continuous layer again. For exposed work, narrow backers can sit in shallow recesses, then be planed and sanded flush for a nearly invisible repair. Fillers work well when the curve stays fixed to a cabinet or wall; thickened epoxy, glue-and-sawdust paste, or custom wood splines press into the kerfs to resist springback. Laminating a full skin of bendable plywood or veneer across the entire surface turns a fragile kerfed arc into a stiff, furniture-grade curve.

Sanding, filling, and finishing kerf-bent pieces for smooth visible curves
Sanding, filling, and finishing start by leveling the kerfed face so individual slots visually blend into a single, flowing surface. Kerf bending involves making precise cuts into the wood to allow it to flex into curves without breaking, so a flexible sanding block or foam pad follows that curve without flattening high spots. Shallow kerfs often disappear after a few passes with 120–150 grit, then 180–220 grit. Deeper slots benefit from a tinted epoxy, glue-and-sawdust paste, or color-matched filler, pressed across the grain and scraped flush after curing. A light mist coat of finish raises the grain, making remaining ridges easier to spot and sand out, before applying clear lacquer, polyurethane, or wiping varnish for a smooth, furniture-grade curve.
Conclusion
Kerf bending involves making precise cuts into the wood to allow it to flex into curves without breaking. This technique is particularly useful for creating tight radii in plywood or solid wood panels. It maintains the wood’s strength while enabling custom shapes for shelves and architectural elements. When grain direction, glue choice, and support all work together, curves stay smooth and consistent from layout to finish. Careful planning of kerf spacing, depth, and blade width, supported by story sticks, templates, and test pieces, keeps each bend predictable and clean. With patient forming, strong reinforcement, and thoughtful finishing, curved work takes on a seamless, custom look. The next project can move beyond straight lines and start exploring bold, flowing shapes with confidence.
Frequently Asked Questions
- What is kerf bending and how does it work for creating curved woodwork?
- Kerf bending is a method of creating curves in solid wood by cutting a series of closely spaced saw cuts, called kerfs, into the back side of the board. These cuts remove just enough material so the wood can flex and form a smooth bend without breaking.
A saw blade makes each kerf cut, and the uncut wood left between the bottom of the kerf and the opposite face of the board acts like a thin hinge. When the board is bent, the kerfs close up on the inside of the curve, while the smooth outside face stays mostly intact. Once the curve is set and supported, the piece can be glued, clamped, and finished like other woodwork.
Kerf bending works well for rounded cabinet faces, curved shelves, archways, and decorative trim, especially when steam bending or laminating would be more complicated or expensive.
- How deep and how far apart should kerf cuts be for a smooth and strong curve?
- Kerf depth and spacing control how easily the board bends and how smooth the finished curve looks.
General guidelines:
– Kerf depth: Most projects leave about 1/8″–3/16″ of material uncut on the face that will show. For a 3/4″ thick board, kerfs often cut 9/16″–5/8″ deep. Too shallow, and the board will resist bending and may crack. Too deep, and the board may become weak or break.
– Kerf spacing: Typical spacing ranges from 1/4″ to 1″ apart. Tighter spacing (1/4″–3/8″) creates a smoother curve with less “faceting” and makes bending easier. Wider spacing (3/4″–1″) works for gentle bends but may leave visible flat spots.Test scraps of the same wood first, adjusting depth and spacing until the curve forms smoothly without tearing fibers or feeling spongy. Different species and thicknesses respond differently, so test cuts avoid issues on the final piece.
- Which types of wood work best for kerf bending curved projects?
- Most straight-grained hardwoods and softwoods can be kerf bent, but some species handle the process more easily and cleanly.
Good choices for kerf bending:
– Plywood with a consistent core (like Baltic birch) bends predictably and stays stable.
– Poplar and alder bend easily and cut cleanly, making them good for painted projects.
– Softwoods like pine and fir can work if the grain is straight, though they dent more easily.
– Maple, oak, and walnut can be kerf bent if the grain is straight and kerfs are well planned.Challenging choices:
– Highly figured wood (curl, quilt, or wild grain) may crack or tear at the kerfs.
– Very brittle hardwoods may chip or fail with tight radii.Straight grain, minimal knots, and stable, dry stock give the best results. For exposed projects, a higher-quality face veneer or solid hardwood on the visible side gives a cleaner finished look.
- How is the correct bend radius determined for a kerf bent piece?
- The bend radius depends on board thickness, kerf depth, kerf spacing, and the wood species. Tighter curves require deeper and more closely spaced kerfs, while gentle curves can use shallower, wider-spaced cuts.
A practical way to find the bend radius:
1. Prepare a test strip from the same material and thickness.
2. Cut a series of kerfs at the planned depth and spacing.
3. Bend the strip over a form, bucket, or template with a known radius.
4. Check for stress signs: cracking, tearing, or visible gaps between kerfs.If the strip resists the bend or the outside fibers feel stressed, the radius is too tight for that setup. To tighten the radius safely, add more kerfs (closer spacing) or increase kerf depth slightly. For production work or repeated curves, a stable template or bending form helps keep the radius consistent from piece to piece.
- How are kerf bent pieces glued and supported so the curve stays permanent?
- Once a kerf bent board is shaped into the desired curve, the kerfs and structure need support so the bend stays permanent and strong.
Common methods:
– Bending form and clamps: A curved form holds the exact shape. The kerfed section is bent against the form and clamped until glue cures. The form keeps the radius true.
– Filling kerfs with glue: Wood glue is brushed or squeezed into the open kerfs before bending. When clamped into the final shape, the glue hardens inside the cuts, locking them closed and adding rigidity.
– Backer strips or ribs: A solid backer board, ribbing, or framework is glued and screwed to the kerfed side. This supports the curve and takes stress off the weakened kerfed area.
– Skinning with a veneer or thin plywood: A thin, flexible sheet is glued to the exposed face or inside of the curve, tying everything together like a shell.Allow full cure time based on the adhesive manufacturer’s directions before removing clamps or putting the piece under load.
- What are the main differences between kerf bending, steam bending, and laminate bending?
- Each bending method has its own strengths, costs, and best uses.
Kerf bending:
– Involves cutting slots into the wood so it can flex.
– Requires common tools like a table saw or circular saw.
– Works quickly and is easy to learn.
– Leaves a weakened area on the kerfed side that benefits from backing or filling.Steam bending:
– Uses heat and moisture to soften the wood fibers, then bends the solid piece around a form.
– Leaves the board intact, with no cuts, so strength can be higher.
– Needs more setup: steam box, form, and strong clamping.
– Works best with certain species and fresh or air-dried lumber.Laminate bending:
– Stacks many thin strips of wood, glues them together, and clamps them around a form.
– Creates a very strong, stable curved piece with consistent grain.
– Requires more gluing, clamping, and cleanup.Kerf bending stands out as a faster, tool-friendly option for cabinets, shelves, and decorative elements where speed, simplicity, and standard shop tools matter.
- How can visible kerf cuts or faceted areas be hidden for a smooth, finished appearance?
- Several techniques help hide kerf cuts and give kerf bent projects a clean, professional look.
On the visible face:
– Plan kerfs on the hidden side: The smooth face becomes the outside or show face of the curve, so the cuts remain unseen.
– Use thin plywood or veneer skins: Glue a flexible plywood or veneer sheet over the curve to hide small flats and imperfections and create a continuous surface.
– Fair and sand the curve: Light sanding with a flexible block or sponge smooths minor facets and blends the curve.On the kerfed side:
– Fill kerfs with glue or epoxy: Once bent and clamped, the closed kerfs can be filled as needed and sanded flush after curing.
– Apply a back panel or trim: Cabinet backs, wall panels, or decorative trim can cover the kerfed area entirely.For painted projects, a high-build primer and careful sanding after filling help erase minor lines. For stained or clear-finished work, planning the kerfs on the non-show side and using matching veneers creates the most seamless result.
Categories
Home Improvement Tips & Tricks